A definition of troubleshooting in histology is: the identification of the cause of a sub-optimal event which occurs in the laboratory and the successful implementation of the corrective action of the event. Since both equipment and humans have error rates associated with them, there will always be an issue that requires troubleshooting. A series of blogs will identify common sub-optimal issues that may occur in a histology laboratory, along with the successful troubleshooting solution. The emphasis will be on understanding “what went wrong” and the problem solving used to correct the issue. Hopefully, this will promote a “troubleshooting mindset” as you move through your laboratory each day.
The best way to minimize troubleshooting is to be proactive and look ahead to possible situations and procedures that exist in your laboratory that may cause sub-optimal events. Once these situations are identified, they can be removed by implementing procedures which should reduce the likelihood that sub-optimal events continue to occur. This knowledge, along with the emphasis on greater patient-care quality, requires that each specimen delivered to your laboratory must be routed to the correct location, and handled appropriately throughout the passage of the specimen.
In histology laboratories, the vast majority of specimens are transported in 10% neutral buffered formalin for “routine histology”. Such specimens will undergo surgical grossing procedures and routine processing through graded alcohols, xylene and paraffin embedding. Initially, slides will be stained with hematoxylin and eosin (H&E) from paraffin blocks. Upon examination by a pathologist, a diagnosis is rendered. Some cases may require additional immunohistochemistry (IHC), molecular, and/or special stains to confirm the diagnosis.
An inherent risk exists for a minority of specimens in which unique, specialized procedures are needed. If these specimens are transported in the improper fixative, or improperly routed into the “routine histology” workflow, they may be unsuitable for later specialized procedures in which they were referred to the laboratory.
Specimens for direct immunofluorescence (DIF) are usually skin and kidney biopsies. Clinicians must be educated that these specimens should not be fixed in formalin. Formalin fixation causes crosslinking of these proteins, which will subsequently change the antigenicity, making the proteins unable to be recognized by the antibodies used in DIF.
The proper transportation of skin and kidney biopsies must be in Michel’s transport medium or Immuno transport fluid, as sometimes named. These transport media contain ammonium sulfate, that acts to precipitate proteins at their precise site of localization. Frozen sections stained with fluorescein labeled antibody will thus reveal the exact histological location of the proteins in question.
Two specimen types may be submitted for urate crystal evaluation: fluids and tissues. Joint fluids obtained by fine needle aspiration may be submitted in the syringe. These specimens must not be fixed in formalin or cytology fixatives. Once in the lab, the fluid should be dispensed onto a clean, labeled microscope slide, using ventilation and Universal Precautions;
As the fluid may contain active, bloodborne pathogens. After air drying, the slide is coverslipped with Permount and observed under polarizing light.
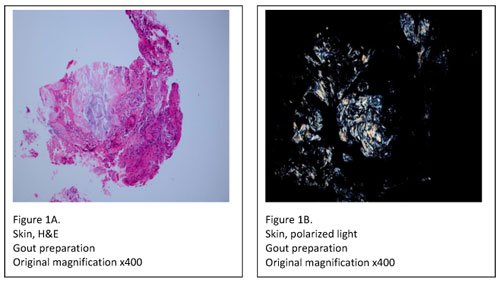
Tissue specimens, on the other hand, must be submitted in either Carnoy’s fixative (chloroform and absolute ethanol) or simply in absolute ethanol. Specimens fixed in formalin should be rejected, as formalin contains water which may dissolve urate crystals. After receipt, the specimen must be processed with 100% ethanol, skipping over the formalin and graded alcohol series in the tissue processor. When processing and embedding are complete, two slides are prepared; one for H&E staining and one specially prepared for urate crystal examination. The slide used for urate crystal detection is rinsed in xylene to remove the paraffin, and then coverslipped. It’s then viewed under polarized light where any urate crystals appear as bright white needles on a black background (Figure 1A, B).

In summary, it’s good practice to impeccably identify all specimens that are delivered to your laboratory for “non-routine” histology. Once identified, detailed procedures should be developed for proper handling of the specimens within the lab. This is the best way to ensure the highest patient-care quality and to alleviate troubleshooting.
Feel free to click the link below to share specific questions and personal lab experiences.
REFERENCES:
- Chapman, C.M. (2017). The Histology Handbook: In Search of the Perfect Microslide. Amazon CreateSpace Independent Publishing Platform
- Chapman, C.M. and Dimenstein, I.B. (2016). Dermatopathology Laboratory Techniques. Amazon CreateSpace Independent Publishing Platform
Both Titles are available on Amazon.com


